It's been a busy week or so! Baby Wyatt Paul was (finally) born Saturday, November 26th...after making all of us wait an extra 2 days! He's adorable and I'll share a photo or two once I have time to unpack.
I drove home yesterday with our 3 (almost 4) year old nephew in tow. That turned a 7.5 hour car ride into an almost 9 hour one! But, we had fun playing on the toys at McDonald's a couple hours down the road from his house, stopping at every single potty stop I could find, and stopping for about 20 minutes at a park that is next to the highway about 1/3 of the way back home. We also had to come to a complete stop on the highway to let 2 deer cross! They were going to cross whether I stopped or not, but we did stop.
This morning we even got our Christmas decorations up! Not that I put much out...no real point since we won't be here, but I did get out a pre-lit (and pre-decorated) 32" potted tree out and set up on the desk by the front door. I got out the decorations that are "3 year old safe" and added a few tiny ornaments to the pre-done tree. It looks cute...and it means that the "take down" post holiday should only take about 20 minutes before we leave.
Well, that's the end of nap time! I'll catch up more tomorrow!
Tuesday, November 29, 2011
Saturday, November 19, 2011
It's that (Crafty) Time of Year!
 So, of course, I have a ton to blog about and can't because that would ruin the surprise(s)!
But, I'm going to share the photos I have taken that don't give away what the items are...later (after they have been given to their intended owners), I will share what they are and how to make a few of them! I made up a few of the patterns, but mostly I have been busy modifying other people's patterns that they were kind enough to give away!
 I have an idea for a project for next year as well. I thought of it while I was browsing an "organic" style baby/kid website. They were selling child-sized sleeping bags (the kind you would send with your kid for a slumber party or for a nap at the baby-sitters, not the kind you go camping in cold weather with) for $70! I know I can make one for cheaper than that! So, I got to sketching (very rough)...first I was using their measurements (33" x 66") and trying to decide how much fabric I would need for one bag.
This way would require:
- Exterior Fabric--any fabric really, but a fun print geared toward the pint-sized owner would be awesome
- Interior Fabric (Lining)--Cotton, Flannel, Silk/Satin...something you'd want next to your skin while you slept
- Batting--the thickest you can find! Or you know, doubled up so it's extra padded...
A side note on Batting...for this estimate of price, I picked the "cheapest" batting sold by the yard I could find at Joann.com, but since I can;t tell how thick it is, this is something I would purchase locally (the first time anyway) so that I know I'm getting the thickest I can get my hands on (and that fits in my sewing machine)!
But you said you could make one for less....why yes I did...see this is where my gears started turning. First, that interior layer of the sleep-sack...why couldn't I just recycle an old sheet (or a new one I found on sale, or clearance for even cheaper)? That would turn the cost for the entire interior layer from $14(ish) to a range of free to about $7 (the most I have ever paid for a single sheet). For the exterior layer...next verse, same as the first! Another sheet! No making sure all the cut edges are the straight and all that! That brings the cost for the exterior layer down from $8 to the same price range of "Free to $7". Batting, well...that's going to be the spendy part of this venture, still going to need that 4 yards or so there...so that's still $24 (the batting I'm pricing it on is this one here...it's 90 inches wide, so I think I could do both sides with a 4 yard length of it, 2 single layers of it, no folding it). It would cut the amount by half though...if my math holds water (the first calculation may be off by $24 though, lol). So, new, recycled version? Costing roughly $24 to $38! It could cost even less if I can find thick batting for even cheaper. We'll see what I can find, but this is what I'm considering giving all the boys for birthdays or Christmas next year. I still need to tweak the idea a bit and see if I can get a good deal on Batting in bulk, ha! This would work for any size sheet really...but as the size of your sheet gets bigger, so does the price of batting! Honestly, who needs a King sized sleeping bag that won't work outside anyway though? (Besides me...)
Another note on Batting...it must be quilted or tied periodically across the entire work, in this case, both sides of the sleep-sack. Just something to remember...it's easily done on any sewing machine by stitching straight lines in both directions, creating a large grid effect (4-inch squares or diamonds).


 I am still working on the "One skein Throws" (even if they are in reality 3-5 skein throws...). I purchased a set of "yarn bags" a few weeks ago because they claimed to make taking your crochet with you easier than ever! Well...the bags literally fits the skein and the skein alone. So, I broke out my sewing machine...you remember, my Singer Style Confidence that I got back in March right?
 I went remnant shopping and came back with several options, but I settled on a pretty purple print that has strawberries, cherries, and watermelon wedges all over! I had enough to make two, large, drawstring bags to go with the yarn bags for easier travel of my project. In the first photo, the bag on the left is finished and the bag on the right is still inside out, while I worked on finishing touches.
 I squared off the bottom corners of each bag, making it more bag shaped (no pointy corners) by running straight stitch across the ends. You can cut the little triangles off, but I tend to leave them on so I don't have to serge the edges.
  Also, before folding the top edge over to create the pouch for the drawstring, in this case a length of 5/8th inch Grosgrain ribbon, I added a large button hole. Using the auto-button hole feature on my machine, I set the "button holder" on the back of the buttonhole foot to slightly wider than my ribbon, set the foot where I wanted the bottom of my buttonhole, and let it do its thing, super simple! Before I ripped the hole open though, I folded over the edge (leaving a 1/2 inch space above the top of the buttonhole), pinned it down all the way around and then ran a straight stitch around the bottom of the drawstring pouch (I followed the stitch line from when I sewed up the raw edge), I used a 1/4" seam here, maybe 3/8"...basically I lined it up with the outer edge of my foot and kept it there. Then, I attached a large safety pin to the open end of my ribbon spool and fed it through the buttonhole (after ripping it open) around and back out the same button hole. I could have done two buttonholes 1/2 to 1 inch apart, then I wouldn't have had to leave a "tail" on my ribbon. To close the ribbon, I folded over the raw edges (You could also melt them so they don't fray with a lighter, but be extremely careful, it doesn't take much heat to melt the ribbon!) and then stitched the ribbon ends together, leaving a "tab" of sorts, it makes it easy to grab to pull the drawstring shut.
Currently, both bag sets are in use for crochet projects (two throws) and another bag (a $10 purse I bought at WalMart this summer) has another crochet project going (a Christmas gift for my Mom), but the intention (once all my "last minute" Christmas madness is done) is to have one bag set for Crochet and one for knit, with the third bag (AKA the purse) for the smaller scale stuff...like all those fashion doll patterns and doilies I do.

I have gone a wee bit nut-so with all the sewing lately...the photo with the boat was one project where I got to put to use some leftover jeans material I had (previously known as the leg to a piar of my own pants). This is still one of my favorites...it was a pattern that I wasn't all that thrilled with, but with a few tweaks of my own, I was able to turn it into something I can very nearly "mass-produce"! Working casually, I can crank out about 10 of these in 8 hours, including one that I fused interfacing to!


Here is the flannel I bought that I mentioned earlier! Isn't it awesome? I have used up all but a few tiny scraps of the yard of this that I bought...but I made a complete "set" as a Christmas gift from it!

I have a new favorite sewing notion...the snap! While I really would like to have a grommet/snap tool ($20-25), I am surviving with the "tool" you can buy with the snaps ($3.47 at WalMart for 10 snaps and the tool versus $2.47 for 7 snaps...) and the other "tool" required...a hammer. I like the snaps so much that I have purchased a second set of the snaps that come with the tool as well as a set that have "pearl" faces! The Pearl snaps look a bit more "professional" in my opinion, but they just are not meant for every use... The blue plastic bit is the "tool" that comes with the snaps, that hole grips the pokey part of the snap and the ring of prongs goes in the other half the tool, then, once positioned properly on the fabric, you give it a few good whacks with a hammer and voila! Half a snap! You have to use 4 pieces for each half of the snap. It's a semi-involved process, so I bought a floss organizer to carry all the small parts (I was accumulating a lot of baggies in my sewing stuff). The embroidery floss organizer was only $3, in comparison to the sewing notions version next to it for $13, I think I got the better end of the deal and this box is twice the size! I would like to get a thread organizer though...

I had intended to make my yarn project bags out of this material, but it's Palencia and felt a bit too "thin" for my bags. So, I set it aside and within a day or two, I had a use for some of it! After cutting the first fabric (we'll call it the "Outer fabric"), I cut 2 of these to use for the inner fabric. The finished size was roughly 12 by 25. My measurements were approximate here and I was rounding some awfully complex actual sizes (like 12 7/16) to make cutting another one a little easier.
 While out looking for a 3mm twin needle for my sewing machine (I have a project that requires a twin needle and my machine recommends a 3mm one), I ran across a clearance sale at Hancock fabrics! I got the 5-piece crochet hook set for $1, originally $10! I paid 11 cents a yard for the two rolls of ribbon under the brown and white spools (10 yards of the bottom and maybe 5 yards of the blue striped on). The other 6 spools were between 16 and 44 cents for the whole spool! The original prices on the spools of ribbon was $1.69 to $4.49! I also got primary colored iron-on patches, on sale, but not on clearance. I spent just under $10 and saved just over $48!

My crochet hook collection has grown by leaps and bounds recently! This isn't even all of them! Also, with the addition of knitting needles to the "family", I have seriously outgrown my Boyle brand hook case. So, once I'm out of the "gift-giving season", I plan on getting a new crochet and knitting needle case sewn up for myself!
 Last, but not least in my "can't show you what I'm really working on, but I'm dying to talk about all my recent crafting" post...a new pattern I was trying out last night! I got all the little pieces cut out and the interfacing fused to each and every piece...I finished this one in about 4 hours last night, starting to cut the pieces to turning off the machine. I really dislike working on things this small...you really have to wrestle with it to keep unwanted layers away from the needle while sewing! The finished size of this project is roughly the size of my palm and there isn't one stitch of hand sewing on it!
Thursday, November 17, 2011
I'm a Bad Blogger...
After my surgery, I really haven't been up to much other than some baking. That is, until yesterday! With Thanksgiving approaching (and the birth of my sister's 4th boy, our 5th Nephew), I had to get my rear into gear! I had things to get done before I leave town!
First on the list...get the girls to start laying eggs again! I added lights to thew coop, a heater to the water, added a few "treats" to their diet (nut filled suet cakes, cracked corn, and "large bird" treats which are really just dried red chili peppers). Finally yesterday, I got 3 eggs! Henri started up three days earlier so I now have 6 "golden" eggs in my fridge and three chickens all fighting over the new favorite nest box! Now to get them to stop roosting on and in the nest boxes!
I drug out my sewing machine, which hadn't been used since March when I bought it, to make "accessory bags" for the purchased "yarn bags" I bought because they claimed to be "travel friendly" for the crocheter or knitter in the family. It was a 2-pack of nylon bags. They work awesome, but the bags only fit a single skein of yarn! The Red Heart Super Saver (my all-round favorite for its versatility and price) has to be smashed in, but it fits. My issue was the actual project! It's great to have the yarn in a bag, the "handle" is long enough I can actually go around my waist with it and wear the yarn ball like a belt, making it easy to use and it isn't falling on the floor every time I shift. But, since I am working on blankets...keeping the bulk of the already crocheted project clean was a challenge, especially since one of my cats' favorite "food" is plastic bags (my original "keep this project clean" idea. So, I found a cute fabric remnant and got to sewing! I ended up with enough fabric to make two bags! Awesome since I have two yarn bags...I can use one for crochet and one for knitting! (Photos to come when I get around to posting about all the projects)

I also have 6 more completed sewing projects that I can't talk about yet...holidays and all, ya know. But, I will be posting photos of them in the coming weeks. For now, I'm off to work on 3-6 more sewing projects and one no-sew project! But, for now...here is a sneak peek at one of the projects that is now finished! I recycled/upcycled/whatever you want to call it, a leg that I cut from a pair of really stretchy jeans several years ago. Ever the pack rat, when I chopped the legs off of the jeans, I kept them and put them in a box of fabric. Since then though, I haven't found a use for them until now! The fabric panel is a square I cut from a fabric that had a mash-up of varying little scenes and such. I eye-balled the "centered" position on the project, so it's likely just a bit "off", but the finished product turned out really nice!
Have an awesome Thanksgiving! I'll be gone for a week, hopefully visiting all four of my nephews and possibly bringing #3 home with me for his first ever "solo" visit to Aunt and Uncle's house! The timing works out because we'll be going back in three weeks from when I leave there...it also gives his parent;s a chance to get acclimated to having another infant in the house while not also having a very jealous new big brother to "deal with" at the same time. #3 is having to give up his "baby" status, part of his bedroom, and all of his "alone time" with them. But, we'll see how things go...a buddy for me for a few weeks is always an awesome thing though.
Wednesday, November 2, 2011
That Four-Letter Word...
Snow, of course, what were you thinking? They are calling for it overnight tonight here in Spokane, yuck! Even though they are really only calling for "up to 1/2 an inch", it's still coming and preparations need to be made ASAP! So, after my 2-week post-op appointment today (where I got the all-clear and told I can skip the 6-week appointment unless we'd like him to be our "we-want-a-baby" doctor), I ran around town in preparation for snow and my being out of town in the near future.
Yesterday my shoes started falling apart, and I mean literally...chunks fell off the sides of both shoes! So, my first stop was the mall to pick out a new pair of shoes, in fact, I got two pair. Payless (as always) is running a BOGO sale, you know, where you get the second pair for 50%. So I picked up a new pair of Champion "Fitness" (I wore through a pair of these over the summer, but they are so comfortable! These are ones that have the "yoga ball" styled toes and heels, so you kind of rock while you walk. I liked them and they were on sale for $24 (normally $35). For my second pair, I spied a pair of Champion "Activelite". They have a flat sole, but are designed for walking in and were on sale for $19 ($9.50 with the BOGO deal). Since I have been going through shoes so fast recently, I suppose that means I'm more active than I was a year ago, half off a pair of shoes was well worth it in my opinion!
Next was the grocery store for a couple of reasons, first of all, I was starving! I didn't cook this morning and had planned to grab an Atkin's bar on my way out the door, but forgot it. Since I needed to pick up some more needle caps for my insulin, I also stocked up on bars and shakes for when my sister goes into labor (any day now, so trying to be as prepared as possible before hand). I also got a package of Grape Tomatoes, they are so yummy!
Last stop before heading home was another trip to the feed store. After researching online, I decided on the bucket and bird bath heater to keep the chicken's water thawed this winter. Usually I can find better deals online than in store, but this time, Aslin-Finch beat out Amazon! For $34, I got my de-icer and got it installed today! While there, I also picked up a bag of Cracked Corn (corn is like a nutritional space heater in the girl's bodies, the energy used to process it keeps their body temps up, therefore warmer chickens! Since the suet cake went over so well on Sunday, I bought several more as well as a suet feeder, which was harder to figure out how to use then it should have been.
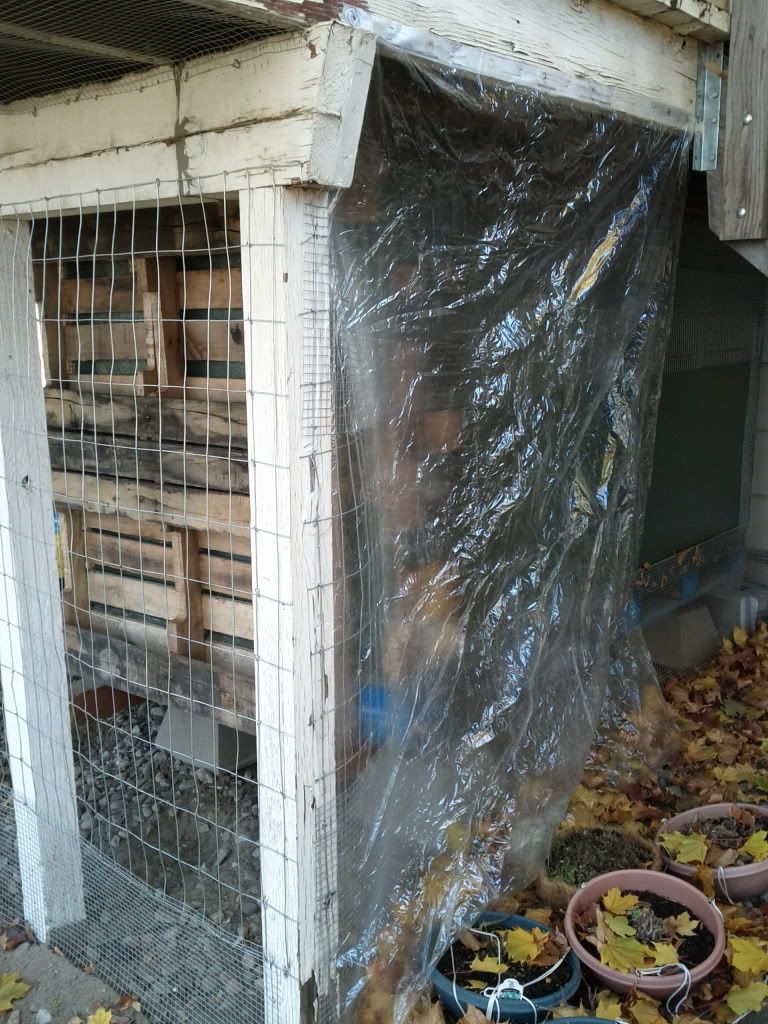 Then it was home to start the "winterization" of the coop & run. All that really meant was "get something up to keep snow from blowing into the coop". For the most part, it's protected, but there is that one spot, to the left of the staircase down off the porch, where the coop has a hardware cloth "window" built into the coop. That was easy enough to protect and took the least amount of time of anything out there today! I had saved the old shower curtain a few months ago when I replaced mine. After running it through the washing machine with a light load of clothes, I hung it up to dry over the railing and then folded it up once dry. Today, I unfolded the curtain, grabbed my staple gun and got to work stapling it up! I wanted to still allow air flow through the window, they'll need the venting to keep the moisture from breathing down in the coop as the temps drop, so I tacked it up on the last beam, about six inches from the coop wall, and then down one side. On the side actually under the stairs, I added a few staples to the coop to angle the curtain in and help try to protect that open window. The curtain still had "flow" and is not tacked anywhere along the bottom, that way it hopefully has enough give to not get torn down too soon! However, we do buy the cheap liners ($3-6), so replacing it won't be too hard to do.
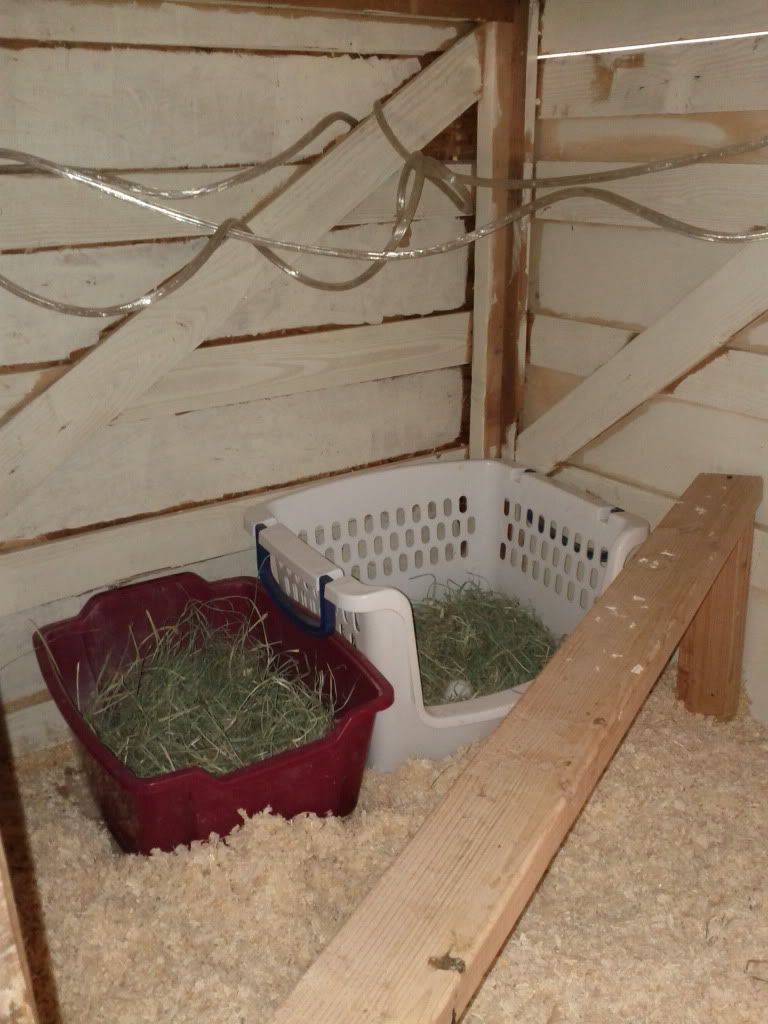 After getting the plastic curtain up, is was time to "pretty up" the rest of the coop and run! They got fresh pine shavings in the coop, as well as fresh Orchard Grass in the nest boxes. The Alfalfa Hay that was in the boxes got dumped into the run for them to pick through. They didn't eat it in the boxes, but once it was on the ground, they have been having a ball finding all the bits of leaf and such in it! Anything to keep them busy and entertained... Here's a good view of the lights I got strung up over the weekend too, I forgot to reset the timer, but will get that done this afternoon as well. They have all been spending more time in the boxes since hanging the lights, but I think we're having a water issue now that is holding up the egg producing.
With the purchase of the de-icing unit, hopefully the girls will again have unlimited water flow! It was simple to hook up too, just lay the unit flat in the bottom of the bucket and plug it in! Of course, to do that, we had to drill a new hole and get a new hanger positioned where the short 6-foot cord could reach the outlet. The water is now hovering over the sand box turtle...but at least they'll have water!
 We've had to punch out two cord "holes" in the cover over the outside outlet now...the lower cord is for the light timer (an outdoor-rated extension cord) and the top for the water heater. That was much easier to do the second time around, when I figured out how to get the cover off!

Doing the clean-up in the coop meant a few added treats and storage options as well. To the left here you can see the relocated water system, the old hay that is a new found toy, and the Cat Litter container. That container is full of Cracked Corn! Weather proof, and most animal proof too! There's even a bowl I use as a scoop in there for a fast treat! I cheated and sprinkled some corn into the hay for this photo op...

I love reusing these Litter containers...the one in the front actually has the extra extension cord wound up in it! This keeps the girls from pecking at or pooping on it. The two containers stacked behind it are full of Chicken feed. With ouring about a cup r so straight in the feeder, a 50-pound bag of crumbles fills three of these litter containers. The third one resides in the black garbage con to weight it down a bit, the hay, pine shaving, Oyster Shell, Grit, BOSS, and Meal worms don't weigh all that much!

One last "treat" to keep the chickens happy, healthy, and entertained through the colder weather months was the Suet Cakes. On Sunday I gave them a "High Energy" Suet cake, which they still have part of laying under their feeder, however, the dirt on it bugs me to no end! So, I picked up a $3 suet holder today, along with several more suet cakes, they're on for a good price and at one or two a week, I wanted to have enough to last! I know it's really hard to see here, but the black wire thing near the concrete pillar is the holder, holding a Suet Cake. I have hardware cloth on this corner of the coop too (covering a one to two inch gap), so it was a easy spot to hook the Suet hanger to that kept the cake away from outer walls were other "wildlife" (squirrels and wild birds) could get at it. The girls are a little afriad of the cage at the moment, but I'm sure they'll figure out there's a yummy treat in there soon enough!
 Remember how I said I went to the Mall today? This really disgusts me...only because I'll be so freaking sick of it by Christmas! They have already begun decorating the Mall for Christmas! November freaking 2nd! Okay, it isn't overboard (yet), and there was no Christmas music being played...but come on! Those strings of lights hanging are covered in bits of ribbon, bows, and those little Mylar "fireworks" looking things too. I could handle the lights, and [probably wouldn't have even noticed them, but the big red bows with fake pine greenery? Ugh.
In other news...my blood sugars have finally decided to cooperate with me! My surgeon was very impressed with my recent readings, but I think he was even more impressed by my being able to wake up with a sugar reading of 36, get up, and treat it myself. Like most people who aren't Diabetic, they go by the numbers others have told them are the "coma thresholds" and are impressed to see people up and moving at anything lower than that arbitrary number. (Case in point, once when I was at camp, so we're talking 20 years ago, one of the camp counselors had a low blood sugar at one of the "dances"...she had a blood sugar of 9 and was still up and active!) At any rate, we did discuss the size of my fibroid (the parasite living off my body for who knows how long) and decided that it may have been contributing to my insulin needs as well.
Below is a photo of my logbook for this week. [I really liked my "free" logbooks I got at a conferrence a few years back, they are made by drug companies to be given away at these sorts of things...I have no idea how to get my hands on more of them! Lilly makes the best logbook, followed closely by Sanofi Aventis! What I have now is the best substitute I could download and print off the internet...] If you look to the far right near the top, you see that 52 at 4am? That was the result of taking 5 units of Lantus before bed the evening before! Prior to surgery, I was taking 26 units every night before going to bed. Now, back in the left most column...138 is still a bit high for a "normal" person, but when have I ever claimed to be normal? For me, this is a great reading! This morning was even better at 103. However, lunch today, even without eating anything other than an Atkin's bar while out and about, killed my average for the day! (Yesterday too...this afternoon isn't pictured here.) I'm going to give it another day or so before I start messing with my morning Lantus, but it appears I may need a bit more in the morning to hold me through lunch and into dinner.

Speaking of the size of my fibroid, it was impressive all in it's own right! My fibroid weighed in at 455 grams (1.003 pounds)! That's just barely over a pound, but that isn't even the part that makes it sound big! An "average" Uterus weighs 70 grams, making my fibroid 6.5 times the size of an average Uterus (making the combined over 7 times the size it should be assuming anything about me is "average")! The doctor told me I am still very swollen and will notice that going away over the next several weeks (possibly a few months), but there was nothing he could do to help with the "skin sag" I have going on.
On the weight front, I have lost all of my "surgery weight" that I gained thanks to a sugar-filled electrolyte IV bag! I've even gone down "unofficially" (since it isn't Friday yet) a few more pounds! This morning I weighed in at 254.0! I was sitting at 256.8 the morning of my surgery. Little steps...my next mini goal is fast approaching, 247.2 will be 50 pounds gone forever! Only 6.8 pounds to go! Since I have switched to wearing exercise shoes already, I'm not really sure what my reward to myself is going to be...my original plan had been a pair of Sketcher's Shape-Ups, but having tried them on and compared to the Champion brand ones, I prefer the less expensive shoe. I still want to keep the "exercise" theme going because 50 pounds gone was my "start point" for really working more activity into my weight loss. I can't lose 150 pounds on diet alone! Maybe a DDR game for my Wii? The issue there is that I still haven't found a decent spot to keep the Wii where I'll actually use it! I already have Wii Fit and Wii Fit Plus, but they haven't been touched in almost a year...and the Wii Fit was the entire reason I bought a Wii in the first place! In January no less when the balance boards were worth their weight in gold if you could get your hands on one (we lucked out and the Circuit City 2 blocks from our house got a shipment in and my other half went down to grab a ticket 2 hours before the store opened for me...they only got 6 in and were basically raffling them to the first 6 people that read their paper and got there before 8am.)...it only took me 2 weeks to get one, but some people had been looking since November for them! (I've had my Wii for about 2 years now, so this may or may not be the case come January...plan your fitness needs well in advance of the "Resolution Rush"!)
I'm tempted to get a gym membership, but I don't like being the "fat girl at the gym who can't keep up"...and jump ropes are out because my bits giggle way too much for that! I've even tried getting in a simple walk for the exercise, but that was lonely alone and the other half just isn't all that motivated to go with me, it lasted about 3 weeks. If I could get a super deal on one of those sit-up machines (padded metal frame that assists you in "proper form"), that might be an option, but I don't think I could justify another piece of equipment when I am so bad at using what we already have! Maybe just an alarm to remind it's time to get up and go use the Wii, lol. Any suggestions?
Yesterday my shoes started falling apart, and I mean literally...chunks fell off the sides of both shoes! So, my first stop was the mall to pick out a new pair of shoes, in fact, I got two pair. Payless (as always) is running a BOGO sale, you know, where you get the second pair for 50%. So I picked up a new pair of Champion "Fitness" (I wore through a pair of these over the summer, but they are so comfortable! These are ones that have the "yoga ball" styled toes and heels, so you kind of rock while you walk. I liked them and they were on sale for $24 (normally $35). For my second pair, I spied a pair of Champion "Activelite". They have a flat sole, but are designed for walking in and were on sale for $19 ($9.50 with the BOGO deal). Since I have been going through shoes so fast recently, I suppose that means I'm more active than I was a year ago, half off a pair of shoes was well worth it in my opinion!
Next was the grocery store for a couple of reasons, first of all, I was starving! I didn't cook this morning and had planned to grab an Atkin's bar on my way out the door, but forgot it. Since I needed to pick up some more needle caps for my insulin, I also stocked up on bars and shakes for when my sister goes into labor (any day now, so trying to be as prepared as possible before hand). I also got a package of Grape Tomatoes, they are so yummy!
Last stop before heading home was another trip to the feed store. After researching online, I decided on the bucket and bird bath heater to keep the chicken's water thawed this winter. Usually I can find better deals online than in store, but this time, Aslin-Finch beat out Amazon! For $34, I got my de-icer and got it installed today! While there, I also picked up a bag of Cracked Corn (corn is like a nutritional space heater in the girl's bodies, the energy used to process it keeps their body temps up, therefore warmer chickens! Since the suet cake went over so well on Sunday, I bought several more as well as a suet feeder, which was harder to figure out how to use then it should have been.
With the purchase of the de-icing unit, hopefully the girls will again have unlimited water flow! It was simple to hook up too, just lay the unit flat in the bottom of the bucket and plug it in! Of course, to do that, we had to drill a new hole and get a new hanger positioned where the short 6-foot cord could reach the outlet. The water is now hovering over the sand box turtle...but at least they'll have water!
Doing the clean-up in the coop meant a few added treats and storage options as well. To the left here you can see the relocated water system, the old hay that is a new found toy, and the Cat Litter container. That container is full of Cracked Corn! Weather proof, and most animal proof too! There's even a bowl I use as a scoop in there for a fast treat! I cheated and sprinkled some corn into the hay for this photo op...
I love reusing these Litter containers...the one in the front actually has the extra extension cord wound up in it! This keeps the girls from pecking at or pooping on it. The two containers stacked behind it are full of Chicken feed. With ouring about a cup r so straight in the feeder, a 50-pound bag of crumbles fills three of these litter containers. The third one resides in the black garbage con to weight it down a bit, the hay, pine shaving, Oyster Shell, Grit, BOSS, and Meal worms don't weigh all that much!
One last "treat" to keep the chickens happy, healthy, and entertained through the colder weather months was the Suet Cakes. On Sunday I gave them a "High Energy" Suet cake, which they still have part of laying under their feeder, however, the dirt on it bugs me to no end! So, I picked up a $3 suet holder today, along with several more suet cakes, they're on for a good price and at one or two a week, I wanted to have enough to last! I know it's really hard to see here, but the black wire thing near the concrete pillar is the holder, holding a Suet Cake. I have hardware cloth on this corner of the coop too (covering a one to two inch gap), so it was a easy spot to hook the Suet hanger to that kept the cake away from outer walls were other "wildlife" (squirrels and wild birds) could get at it. The girls are a little afriad of the cage at the moment, but I'm sure they'll figure out there's a yummy treat in there soon enough!
In other news...my blood sugars have finally decided to cooperate with me! My surgeon was very impressed with my recent readings, but I think he was even more impressed by my being able to wake up with a sugar reading of 36, get up, and treat it myself. Like most people who aren't Diabetic, they go by the numbers others have told them are the "coma thresholds" and are impressed to see people up and moving at anything lower than that arbitrary number. (Case in point, once when I was at camp, so we're talking 20 years ago, one of the camp counselors had a low blood sugar at one of the "dances"...she had a blood sugar of 9 and was still up and active!) At any rate, we did discuss the size of my fibroid (the parasite living off my body for who knows how long) and decided that it may have been contributing to my insulin needs as well.
Below is a photo of my logbook for this week. [I really liked my "free" logbooks I got at a conferrence a few years back, they are made by drug companies to be given away at these sorts of things...I have no idea how to get my hands on more of them! Lilly makes the best logbook, followed closely by Sanofi Aventis! What I have now is the best substitute I could download and print off the internet...] If you look to the far right near the top, you see that 52 at 4am? That was the result of taking 5 units of Lantus before bed the evening before! Prior to surgery, I was taking 26 units every night before going to bed. Now, back in the left most column...138 is still a bit high for a "normal" person, but when have I ever claimed to be normal? For me, this is a great reading! This morning was even better at 103. However, lunch today, even without eating anything other than an Atkin's bar while out and about, killed my average for the day! (Yesterday too...this afternoon isn't pictured here.) I'm going to give it another day or so before I start messing with my morning Lantus, but it appears I may need a bit more in the morning to hold me through lunch and into dinner.
Speaking of the size of my fibroid, it was impressive all in it's own right! My fibroid weighed in at 455 grams (1.003 pounds)! That's just barely over a pound, but that isn't even the part that makes it sound big! An "average" Uterus weighs 70 grams, making my fibroid 6.5 times the size of an average Uterus (making the combined over 7 times the size it should be assuming anything about me is "average")! The doctor told me I am still very swollen and will notice that going away over the next several weeks (possibly a few months), but there was nothing he could do to help with the "skin sag" I have going on.
On the weight front, I have lost all of my "surgery weight" that I gained thanks to a sugar-filled electrolyte IV bag! I've even gone down "unofficially" (since it isn't Friday yet) a few more pounds! This morning I weighed in at 254.0! I was sitting at 256.8 the morning of my surgery. Little steps...my next mini goal is fast approaching, 247.2 will be 50 pounds gone forever! Only 6.8 pounds to go! Since I have switched to wearing exercise shoes already, I'm not really sure what my reward to myself is going to be...my original plan had been a pair of Sketcher's Shape-Ups, but having tried them on and compared to the Champion brand ones, I prefer the less expensive shoe. I still want to keep the "exercise" theme going because 50 pounds gone was my "start point" for really working more activity into my weight loss. I can't lose 150 pounds on diet alone! Maybe a DDR game for my Wii? The issue there is that I still haven't found a decent spot to keep the Wii where I'll actually use it! I already have Wii Fit and Wii Fit Plus, but they haven't been touched in almost a year...and the Wii Fit was the entire reason I bought a Wii in the first place! In January no less when the balance boards were worth their weight in gold if you could get your hands on one (we lucked out and the Circuit City 2 blocks from our house got a shipment in and my other half went down to grab a ticket 2 hours before the store opened for me...they only got 6 in and were basically raffling them to the first 6 people that read their paper and got there before 8am.)...it only took me 2 weeks to get one, but some people had been looking since November for them! (I've had my Wii for about 2 years now, so this may or may not be the case come January...plan your fitness needs well in advance of the "Resolution Rush"!)
I'm tempted to get a gym membership, but I don't like being the "fat girl at the gym who can't keep up"...and jump ropes are out because my bits giggle way too much for that! I've even tried getting in a simple walk for the exercise, but that was lonely alone and the other half just isn't all that motivated to go with me, it lasted about 3 weeks. If I could get a super deal on one of those sit-up machines (padded metal frame that assists you in "proper form"), that might be an option, but I don't think I could justify another piece of equipment when I am so bad at using what we already have! Maybe just an alarm to remind it's time to get up and go use the Wii, lol. Any suggestions?
Subscribe to:
Posts (Atom)