Showing posts with label Crafts. Show all posts

Monday, March 11, 2013

Baby Shades, Laundry, & a Craft Project!


 His future's so bright, he has to wear shades!  Or rather, he has Macular Degeneration running in his family and he has to wear shades...  At any rate, I was fairly unhappy with the sunglasses I got in the mail last week (I ordered them from one of my favorite baby shops, diapers.com) because they dug into his head pretty badly, even though when I put them on him, they appeared loose.  The problem with baby shades is that they put a Neoprene strap on them instead of the arms that go over your ears (in most cases), these act more like swim goggles and Gabriel ended up with red marks in the shape of his sunglasses around his eyes.  Also, when he had just had "enough" of them and tried to remove them (a good hour after they'd been put on), he snapped them back into his eye and nose!  This new pair (purchased at The Children's Place for $3.50) has arms, not Neoprene...they are a little big on him, so the fit isn't ideal, but he leaves them alone for the most part.  Ignore the pacifier...it's more of a "security blanket" than anything, if we don't have it with us he cries, if we do have it, he doesn't want or need it!


What happens when you have four loads of the baby's laundry and two more loads of diapers (not to mention two loads of adult laundry, not pictured)?  A mountain of laundry to fold and put away, hopefully before it all gets used again!  The stuff on top of the table (a card table) is all the stuff Gabriel fits right now, also up there is his pile of burp rags (only two of them were not in the wash, though they are both there now), and about half his towels (there's still one or two in the bath basket)!  The square laundry basket right under the table has a few blankets, a couple of sheets, changing pad covers, and one or two sheet savers.  Also, the ducky bag is a set of cloth diapers (with an AIO and an "extra" liner because the diaper it goes in is set off to be repaired)!  Behind that is a half basket of stuff that I bought last week that is (way) too big still...18 month to 2T stuff I got from the resale shop when it was marked down to 50% off! And, another bag of diapers...

This is something I have been meaning to get to for a while now...  The camo squares are breast pad sized rice packs!  They're roughly the size of my palm and designed to be warmed in the microwave for 15-30 seconds and placed in my bra after nursing and/or pumping to help ease the nipple pain I've been experiencing since the baby was born!  I know, I know...he'll be 5 months old tomorrow and I am just now getting around to it!  Oh boy though, I should have made these before he was born!  Most nights I go to sleep crying (or nearly crying) because my boobs hurt in some fashion...last night, I pumped (11.5 ounces, I really need to find more time to pump so I don't get "that" full) and then popped these in the microwave for 30 seconds.  They were way too hot at that point, so I put them behind a breast pad (a reusable one) so I did not burn my nipples!  Oh the relief of the heat helping to ease the muscle spams I get in my nipples!  No more white nipples either, they got the much needed blood into the circulation system!  I took them out after 15 minutes or so (once they lost most of the heat) and went to bed with "happy nipples" for once!  Of course, then I laid awake humming a song to myslef because what else does a sleep deprived mother do when the day's chores are done, the baby is asleep, and you know you have to be up at 2am and then up for the day by 6am?  Yeah...I finally drifted off some time after 12am, who needs sleep!?

I want to make some larger sized rice packs now...these are great for small injuries and I can see these being awesome when Gabriel is bigger and gets "boo-boo's" because they are small and light-weight.   They are not washable though!  If I had been thinking, I would have made the rice packet in a cheap cotton and then made a little "pillowcase" with the soft material so that it could be washed.  That's what I'll do with the next set I make...  For now, my "Booby-Boo-Boo Heat Packs" are "good enough" for my needs (I've been running around all morning with these stuffed in my shirt)!

Monday, March 4, 2013

No Moldy Duckies Here!

Okay, so this one isn't a "craft" per se...but, it does require a bit of skill with a glue gun!  Now that Gabriel is really reaching and playing with his toys, it has been a challenge to hold on to him in the bath as he chases after the "water safety" duck (that says "hot" on the bottom and the letters turn white if the bath water is too hot, ours is a Policeman Duck)!  So, time to break out the bath toys!  But wait...they all have these giant holes in the bottom!  Water goes in, but can't get back out...what a design flaw (or ingenious plan to make it so you have to replace them with new ones every few months)!

I saw this idea on Pintrest (which I still have no clue how to use, so if you "follow" me there that's why everything is so jumbled...) or maybe it was on a blog somewhere...I forget, I was like 6 months pregnant and didn't bookmark or "pin it" (because I don't know how to pin stuff...), I apologize to whomever it was that came up with the idea, I can't give them credit!  But here it is anyway...with photos!

What You'll Need...

  • NEW Bath Toys with Holes in them (We have Rubber Duckies) (or totally dry, free of fluids ones)
  • Low Temp Glue Gun
  • Extra Glue for your Glue Gun (I use Multi-Temp Glue)
  • Glasses, Jars, Shot Glasses...anything to hold your toys hole side up

First, gather all bath toys with the stupid silly holes...  All we have right now is rubber duckies and two bath books, we really need to get him a better variety of bath toys!


Now, flip them over!  Hard step, I know...  As it turned out, it was really difficult to do it this way, so don't bother doing this.  Also, don't try to make the filler "flat" against the duck by sticking Aluminum foil to it...all you will succeed in doing is pulling the filler right back out, it's a waste of time and resources, I should know...I tried it first!
Instead, gather up glasses, jam/cheese jars, condiment cups, and/or shot glasses!  Anything that will hold your duckies (or other bath toys) upside down and relatively flat where the hole is.  If it's flat, you'll get a nice, symmetrical fill...if they aren't flat, you get a nice, asymmetric fill.  Now, take your glue gun (pre-heated and ready to go, right?) and squeeze enough glue to fill the hole and leave a little mound of glue above it.  I used two trigger fulls on the bigger duckies and one in the smaller duckies.

Here's a close up of the difference...  The blue ducky was flat, the yellow was not.  I don't think it makes much of a difference, but it might make them float "funny", I haven't taken ours for a test swim yet.

I think it is pretty darned important (and that's why I didn't mention it first...who would do that?) to mention that I used Low Temp Hot Glue!  You don't want to use the High temp stuff...you could burn/melt your bath toys and really injure yourself if you drip it on you!  The low temp stuff won't kill your toys and if you accidentally get a body part between the ducky and the glue gun (with a string of glue still keeping the two attached), you won't get hurt when said glue hits you too!

Also, if the glue starts pulling away from your toy, just pull it off and apply fresh glue!  Just make sure there's no fluid in your toy.

Now, go glue all your bath toys shut!  I need to go do laundry...

Thursday, October 11, 2012

Soaps, Sinks, and "Something"...

Today is the day before we get to finally meet our little man!  So, how does one spend the last day of being a "non-parent"?  Well, Garrick is at the doctor's office for a follow-up to his Kidney Stone "issues" about six months ago (of course, he thinks he has another one as well, so it's a good thing to be doing).  My Mom and I are here at the house while a plumber installs my new sink and garbage disposal!  We talked about doing it ourselves, but with the height differences in the sinks, the drains not being directly across from each other, and a few other "oddities", it was just easier to hire someone who knows what they are doing!  We did manage to get the clothesline post in the ground all by ourselves yesterday though, so we aren't complete "newbs" at the home improvement type stuff!  I highly recommend the "Quick-crete" that you just dump in the hole filled with water, that it awesome stuff and you don't have to mix it!

Another thing we may get to today is laundry soap making...I still have 3 gallons of the Ivory Soap stuff I made a while back (in April or May), but I remembered it last night while I was at the store, so I bought another 3-pack of bar soap.  This time though, I got Kirk's Original Coco Castile Soap...this is a soap made with no animal fats (coconut oil, "coconut soap" (made by a chemical reaction between lye and coconut oil and a few other things I'm sure), and a thing or two more)...more information on this soap can be found in the FAQ section of the company's webite, www.kirksnatural.com.  More importantly, I won't have to panic if a diaper ends up in the "regular" wash once my soap doesn't contain Ivory anymore! 
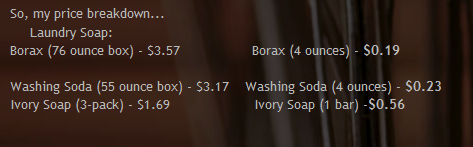
I'll take the added cost to not have to spend days and days (okay, hours and hours) stripping diapers again!  In my post, here, I broke down the cost of making my laundry soap based on what I paid for the ingredients used.  To the right is my price breakdown.  The difference with this soap lies in the soap costs, $3.49 for a 3-pack of Kirk's Castile as opposed to the $1.69 I paid for a 3-pack of Ivory.  That brings the total cost for materials to $11.92 for six batches of laundry soap (at 2 gallons per batch, making at least 64 loads)!  I also have used the Borax and Washing Soda to make many other things, including the powdered Cloth Diaper Detergent that I discussed here.  So, that averages out to $0.031 per load (assuming we get 64 loads out of each 2-gallon batch, we get more out of some batches and less out of others).  I have a coupon sitting on my desk from a few weeks ago for Tide...32 loads for $5.99 (or $0.187 per load)!  I am still saving money, that's what counts! 

If I price out a single batch of the "new" laundry soap using Kirk's...
  • Borax (4 ounces) - $0.19
  • Washing Soda (4 ounces) - $0.23
  • Kirk's Castile (1 bar) - $1.16
That's $1.58 for a 2 gallon batch (assuming 64 loads), that's $0.025 per load!  A full penny more than with Ivory soap...but let's see you get 64 loads of laundry done with Tide for only $1.58...without being an extreme couponer (those ladies are totally nuts in my "oh so humble" opinion)!

A few days ago, I went out to spend some quality time with the chickens after they went to bed (the only time they let me near them anymore).  Poor Clyde is molting big time!  She decided it was "easiest" to drop all her feathers at once and then grow them in...or at least that's what it looks like.  She has no tail feathers at all!  Okay, she has pin feathers growing in, but she looks rumpless at the moment...  See how rough she looks compared to Henri in the photo(sorry for the blurry chicken head, they don't like to hold still much)?

And of course, it wouldn't be two days before the baby's here without a trip last night to Labor & Delivery's triage!  My Blood Pressure spiked last night while out doing some grocery shopping...  I stopped by the machine inside Fred Meyer to get an estimate because I suddenly had a headache and was unsure if it was pressure or sugar related.  When I saw these numbers (photo to the left), I went to test my blood sugar (120)!  Of course, a call into the on-call doctor meant I had to go in...  We spent almost 2 hours hooked up to the monitors (baby hates the monitors and spent the whole time trying to kick them off) before the on-call OB decided to just give me an extra 100mg of my blood pressure meds and send me home for the night.  Little man succeeded in kicking off the fetal monitor about 30 seconds before the nurse came in to remove them...which, of course, set off the alarms when his heart rate was lost.  My blood pressure never did fall much under what I took a photo of at Fred Meyer...and I think the nurse was actually surprised at how accurate it was (she admonished me for using it when we first got there).
 
Here is the new sink all installed! We had the disposal put in the smaller sink on the right (closer to the wall switch that runs it) and the bright green thing in it is designed to keep silverware and the like from getting down in the disposal, but still lets the water pass.  Most of the soaps on the left will fade away as we empty the partial bottles...the thing way over on the right side is a soap dispenser!  In fact...I may go put those two partial bottles under the sink for now (the purple one is what I make my "Gardner's Scrub" with (the glass jar next to it)...of course, I use it mor for scrubbing gunk out of pans when it's baked on then I do for cleaning my hands after gardening, but ya know...  I can't wait to give somebody a bath in it!

So, don't expect any news from me in the next few days...baby will be here in less than 24 hours!  Whoever guessed he'd be here the week of 10/10 was right!  Go you, who ever you are!  We're scheduled to begin the c-section at 7:30 tomorrow morning and I'm going to (hopefully) have someone update on Facebook soon after he's here (give or take an hour or so).  If not, I'll get around to it "eventually", ha!

Until then, I'm gonna go try out a low-carb (sugar free, gluten free) recipe for Halloween Cutout Cookies!  I love making cut out style cookies...and getting to use my ~100 cookie cutters is a definite bonus!

Friday, October 5, 2012

The Birthday that Wasn't...

I couldn't resist snapping this yesterday while out shopping!
Yesterday was "D-day" or at least that was the plan...  Everyone was up early, getting ready to get going to be at the hospital by 9am, so we could have this baby finally!  That is, until the phone rang at 7:46am...  It was the hospital calling to cancel my surgery!  As it turns out, no news isn't always good news.  The results of the amniocentesis had come back and things weren't looking as good as they should, so little man needs to "cook" for another week.  We are now scheduled to go in at the end of next week and are not redoing the amniocentesis, so I am assuming this one won't get cancelled!

Of course, that didn't stop us from having to make a trip to labor & delivery yesterday either.  Little man was really gearing up over the course of a few days (thanks to lots of activity on my part, I'm sure) and I was having contractions in my back all of Wednesday and yesterday they had progressed around to the front and I timed them for over an hour at 2.5 minutes apart!  We really thought yesterday was going to be it, one way or another!  But, as soon as we got there and hooked up to the machines...they all but stopped.  I was still having contractions, but they slowed to about 10 minutes apart and weren't nearly as painful.  Baby's heart rate was sticking right around 135 (a little slow for him, but good) except when a contraction would hit (even the ones that I couldn't really "feel" but could see on the monitor), it would jump up to 175-180 and then plummet to 112-115!  The nurse didn't seem to worried about it though and they proceeded to send me home with orders to "take it easy" for the next few days and make another appointment with my OB (who I got to see last night since we were there right at the end of office hours) early next week.  I even followed their advice today after a miserable night of no sleep and lots more pain.  No contractions today, but little man seems to be doing a lot of sleeping and recouping of his own today too!

Since I'm not on bed rest, just taking it easy, I have been doing a lot of "sit and work quietly" type stuff today.  First thing I did was got my "main" character on World of Warcraft up to level 90 (new expansion came out on September 26).  I've been slowly plugging away at her since we got the new expansion, I'm happy I was able to get her up there before baby was born...it was a goal I thought I had missed reaching.  I also made up a batch of "Honey Apple Wipes Solution" using Johnson & Johnson's Honey Apple Baby Wash, Coconut Oil, and Distilled Water (I boiled water for a good 10 minutes and used that...the rest is cooling in a glass jar to use to soak the wipes warmer's "stay fresh pad" in).  I filled a travel spray bottle and have the rest in a large jar ready to soak cloth wipes in closer to when the baby is actually here (wipes don't stay fresh forever when they aren't filled with chemicals)!  It smells so good though!
Next, I got the car seats torn apart to wash!  I don't remember if I mentioned getting them, but when we took back the dresser pieces to Baby Depot, someone was there buying new car seats (the next size up) for her twins.  She left the old car seats sitting in a shopping cart and drove off!  So, I packed them into my car and brought them home.  There isn't anything wrong with them (other than being grossly dirty) and she had tried to sell them to people inside who were buying car seats!  Well, I finally got around to pulling the "washable" pieces off today and run through the washer, something I don't believe had ever been done to them from the nastiness that was under the fabric and how crusty the straps were!  After once through the washer (with a double load of laundry soap, yeah for homemade that doesn't foam up!), they look brand new!  I plan on seeing if any of the consignment shops are interested in them (but the shops I like to take my business to are overloaded right now) or maybe just snap a few photos and put them on Craigslist...  They are Safety First brand and come with the bases that have the LATCH system, but no instruction books...the previous "owner" didn't deem those necessary to keep in the storage spot on the back of either car seat.  I may look and see if I can find it online to provide with these because I find it very useful to have (especially the part that tells you how to get all the buckles off and back on properly)!  I actually need to look it up anyway so that I can get part of the straps off, the metal part that holds it on appears to be too big to come out the way it is supposed to for cleaning.  I got all the other straps washed though...it looks really nice!

Then, I sewed a button onto a pair of pants for my Mom...no photo available, I just used the "button" setting in my sewing machine...it was super easy.  After that, lunch.  McDonald's because chicken nuggets were calling my name (along with a free Mocha Frappe that I had a free coupon for)!  After lunch, I made a second wet bag liner for our dry pail.  Doesn't that sound "intriguing", ha!  Basically, it's just a water proof trash bag to make carrying the dirty diapers down to the laundry easier. 
"Action shot" of a wet bag liner in use!
I had made one Wednesday evening, but had "run out of time" before getting a second one made (since these get washed right along with the diapers).  I made my bags based on my dry pail (an 8 gallon trash can with a "pop top" lid), seamed the sides together, keeping the bottom of the bag seamless for "extra" waterproof-ness, made enclosed (french) seams for even more waterproofing, and added fold-over elastic to the top edge that included a loop of "extra" elastic for hanging on a knob or door handle as well as making removal easier!

Next up was a larger wet bag with a zipper for traveling with...I kind of went overboard a little bit in the size department here, but I was using the last piece in a three pack of the "cute" Babyville PUL that was given to me.  I made two smaller bags using the frog print, but they turned out too small for "extended" outings (but will work great for other uses).  This time, my bag ended up measuring 19.5-inches by 22-inches!  The wet bag is bigger than the pail liners (which are roughly 16-inches by 18-inches or so)!

To make this bag, I simply cut a piece of the white PUL to match the size of the duck printed PUL, put in an invisible zipper, stitched the seams, and stitched around the zipper to keep the fabric from pulling over the top of it and being extra difficult!  The stitching is nowhere near "perfect", but it works for me!

So, here is where little man sits today...

We did get his room (mostly) finished Wednesday night too...but I promised not to share those photos until after someone in particular is here to see them.  It's super cute though!

Instead, I'll share this!  My Mom bought us a new sink!  This is our gift instead of one of those plastic baby bathtubs that are really just a big pain in the you know what.  The left side is 9-inches deep and huge and the right side is about half the size of the left and only 8-inches deep (this is the side I think should get the garbage disposal).  It came with the faucet, soap dispenser, a basket for the right and a grate for the left (to keep your dishes from scratching the sink), it even came with the drain parts!  As soon as Garrick and I get a new disposal bought (soon hopefully), and look into putting it in ourselves (the cost to have it installed by Home Depot's guys is more than the sink cost to begin with) versus hiring a handy man (anyone know a good and cheap one in the Spokane area that knows how to install a sink properly?), we'll be able to give little man baths right in the sink, no bending over and killing myself in the bathtub!  We picked it up yesterday while I was spending my "extra time" doing some last minute shopping (I hadn't bought feed for the chickens and they were out).

The up side to the new surgery time is that I got the very first slot in the morning...rather than having to wait half the day away, we should have our family complete before breakfast!

Saturday, September 22, 2012

One or Two more Projects to Go...

I finally got around to packing the diaper bag for our imminent trip to the hospital to meet our little one!  As I mentioned the other day, I was super excited about finding my Skip Hop bag for only $6.99.  However, it is just too small!  With four disposable diapers (newborn size samples just to get us home...we have a whopping 10 disposables, lol), a sample pack of Pampers wipes (six whole wipes), 2 sample packs of "throw away" nursing pads just in case I need them at the hospital...also samples), two receiving blankets, one SwaddleMe (in case it's super cold, but we're still getting 90 degree day time temps here), two pairs of socks and mittens (babies have razor sharp talons and I don't want him scratching up his face), one pacifier (in case of emergency), three or four outfits to wear at the hospital (mainly to get his scent on them to send home for the cats and dog to get used to him before he gets here), and one coming home outfit...the bag was stuffed so full I couldn't get the Velcro to stick half the time! 

I was worried but decided that maybe, just maybe, I had over-packed and wasn't going to say anything about it...after all, the bag is $58 brand new...no one would charge that for a teeny tiny bag that is totally useless, right?  Well, Garrick had no problem commenting on the small size of the bag, lol.  In fact, he actually suggested we go out and buy a bigger bag!  Since I was out and about doing a little shopping yesterday, I searched every place i went (Target, ShopKo, WalMart, even Carter's) and only came up with smaller bags!  On to plan "C" then...I've been eyeballing a diaper bag pattern I had printed out from someone's blog for about a week, I had actually thought it would make a good, large, purse for when I travel and cram everything but the kitchen sink in my purse!  I was pretty sure that the dimensions were going to be too small for a diaper bag (even though it was a diaper bag pattern), at least for me, but I was willing to give it a try.  I knew that I needed 1.25 yards of the exterior fabric and 1 yard of a lining fabric (or reverse the quantities if you want your interior pockets to match the interior of the bag).  Also, I knew that my "real" diaper bag was going to need to be a little more "heavy duty" than plain old Cotton.  So, I went to the Home Decor section of the fabric department at WalMart and found a really pretty material for under $7 a yard and bought 2 yards (planning on needing to make the bag bigger).  I then went to the Apparel section of the fabrics and picked out a coordinating cotton for the lining and got 2 yards of that too.  I also thought it would be nice to have a "built in" wet bag, so I picked up an invisible zipper as well (planning ahead for pattern alterations) and thread to match the exterior fabric.

After a day full of shopping, I headed home to make my "test bag" using the pattern just as it was written and fabrics I already had at home (remember, I did say I hoard fabric a "little bit")!  The only thing I bought specifically for this project was a set of magnetic snaps, they come in a two-pack and I actually bought these last week thinking I was going to make a purse for myself.  The first thing I did was cut out all my pieces (well, the ones I planned on using anyway), that took a few hours, but mostly because I did a lot of ironing as well!  I was able to get the exterior bag fabric pieces sewn as well as the straps last night before it was time to hit the hay for the evening.  This morning I got up and went straight to work on the bag!  I made my own double-fold bias tape rather than buying any, this was I was able to use the same fabric for it (I did not use my bias tape maker though...I didn't want to mess with getting it out for only one piece of bias tape that was 26-inches long (I actually needed two of them, but I digress)!

This morning I also discovered an error I had made when cutting out my pieces...  I had cut the corners out on the wrong side of my lining fabric!  To make matters worse, I did not have enough material left to re-cut the pieces!  After staring at my fabric for a good 10 minutes, I finally decided I could use scraps of the exterior fabric to make a pocket where I was "missing" fabric and re-cut the corner notches where they belonged.  Of course, when it came to sewing the whole thing together...this made for some tricky measuring!  The interior pockets have pin-tucks in them as well...these always fight me, but I did finally figure out the "easy way" of keeping everything straight and therefor easier to deal with (on the second side).  Of course, the first piece of elastic also gave me a bit of trouble, but nothing ging fishing down the sewn bias tape tube with a safety pin couldn't cure!

The pocket I ended up adding to the pattern is roughly 7.5-inches wide and is located 4.25-inches from the top of the bag.  Maybe a little deep for dropping my keys into, but we shall see!  I maybe should have made two smaller pockets here instead of one big one, since it goes over the side seam (where the elastic bands are stitched together), but I didn't notice the "sag" from the elastic-topped pockets until after the bag was stitched closed.  So, I did the "next best thing" and added a snap!  From the outside, there is a simple pearl snap face and the interior is secured shut, but still easily accessed if you need to dig in the pocket (which is about 5-inches deep).

Finished size of the bag is approximately 18-inches tall with 8-inch sides and a 12-inch front (and back).  It really sounds small, doesn't it?

But, what does it hold?  Everything from the other diaper bag and this one isn't even half full!  I went with a simple four-pocket design for the interior because I was unsure of how the cloth diapers would fit, but after seeing how my receiving blankets fit, I could have easily gone with six-pockets!

Changes coming for the "real" diaper bag...adding a zippered wet bag in the back panel (between lining and exterior), one or two pockets on the exterior (one or both pockets just like the inside, just on the exterior of the bag), key fob (or a loop at any rate so I have an easy spot to go with my keys), and a few smaller pockets to hold items like my spray bottle of wipe solution (not yet purchased), a handful of cloth wipes, maybe a pee-pee teepee or two.  As a general rule, I don't plan on having this much clothing in the bag, so the middle section is most likely where my "purse" items will go, but I do want to add a few small pieces of elastic to the side higher up to hook my insulin on so it doesn't get lost in the great abyss!

Rest assured, this bag will not go to waste just because it was a "tester", it matches the sling I made!  The matching set will get used often, I imagine!  And see the little "Pooh" thingy on the handle?  That's a pacifier clip that my sister gave me (she made the strap that is actually holding the pacifier on the other end of it)!  I thought it went well color-wise, lol.

Thursday, September 20, 2012

Update on the 1600 Quilt...

Okay, so I never actually got around to posting about it, oops!  But, the quilt in question is the one I mentioned in this post, the one I made that started the entire nursery set!  I'm not sure if the jelly roll I started with was smaller than "normal" or what...but there is no way I could make my single jelly roll turn into a full (twin sized) quilt!  I decided I would have needed four of them to make a "normal" quilt!  However, I have managed to find out where the original pattern came from (or at least who is claiming it as their own) and wanted to share that with you.

First, I saw the blanket idea on someone's blog, I bookmarked it, ran to the nearest store (WalMart), and bought myself a jelly roll!  I then stared at the blog (Happier Than A Bird Quilts) for a week or so, and at my newly purchased jelly roll that sat on my desk, before finally deciding I had studied the directions long enough to not really screw it up.  I'll be honest with you...part of the reason I never got around to writing a post about it was because the other blog site was down and I could not reference back to it!  But, it is back up and running this morning.  She took "liberties" with the original and I then took some more when I used her "pattern"!

With her site back up and running, I was able to answer a few questions (asked on my personal Facebook page) about the quilt pattern.  First, "Why is it called a 1600 quilt?"  Well, looking at Heirloom Creation's page regarding their quilt pattern...(found here) it is called a 1600 quilt because it starts off "life" as a 1,600 inch strip!  You start with a jelly roll (or stash of pre-cut strips of your choosing) that are all 2.5-inches by 40-inches and you use 40 strips.  40 times 40 is...1,600!  Ingenious, I tell ya!  I believe my jelly roll only came with 32 strips though, so I guess I actually made a 1280 quilt?  Next time I make one of these, I'm going to buy my fabric off the bolts and cut my own strips (2.5-inch cuts the width of the fabric of your choosing).  I may or may not choose to do mitered corners (the angled seams on the ones at Heirloom Creations), but doing straight seams is sure easier to keep even!  I also did not cut off 18-inches before I started like the original says, or even half a strip like she did over at Happier Than A Bird Quilts, I simply cut off 8 to 10 inches.  It seemed to work out very nicely.

Next time I would like to have more than 8 patterns in my fabric choices...I may start just asking for an extra 1/4 yard of everything I buy to build up a stash of strips!  Of course...I "could" also go through my boxes (and boxes) of fabrics and just start cutting them up too...but most of those are "special" prints that I want to find the "perfect" use for (another way of saying I'm a fabric hoarder).

If you own a sewing machine (or have access to one), you really should make one of these quilts!  The size I ended up with is just longer than a standard crib mattress is wide (the stripes should run horizontal, not vertical like they do on my finished quilt) and as for width (length on mine), I have it tucked under the mattress by about 4 inches in the photo above and the folded over part at the top reaches just to the top of the mattress!  Perfectly sized to lay across the end of a twin bed or over the back of a chair or the couch.  If I had had the entire 1,600 inches to start, it probably would cover the top of a twin bed (like old style handmade quilts were supposed to).

It really is easy to make!  After you sew all the short ends together (into a super long strip), you take your two ends (the start and finish of you strip), sew them together, cut the end so it can open up, finish your end (so your stitching doesn't unravel), fold again and repeat!  Follow the directions on either link above!  I ended up using a low loft batting with my finished quilt "top", originally I purchased a super high loft one (for uber fluffiness), but was talked out of using it.  I suggest quilting it to your top now rather than waiting like I did!  We (my Mom helped me put the backing and batting on this quilt) had to piece together the flannel I used for the backing on this one as well.  When I purchased it (for another use originally), I bought what they had left, which was two one-yard pieces.  That just means there is a seam on the back...but it is hardly noticeable and I believe it is toward the "foot" end of the quilt  anyway.  Once we got the backing sewed on, we then put the batting in (like I said, do this before you do your backing...much easier that way).  To keep the batting from shifting with washes, I simply sewed "in the ditch" down every other strip (the batting directions said to quilt ever 4 to 6 inches, since the strips were 2.5 inches to start and I used a 1/4-inch seam, the stitch "lines" were 2-inches, making every other one at perfect 4-inch intervals).  I could have also gone the other direction and quilted the now striped backing into squares, but I think that's a little bit of overkill and then my "imperfections" would have really shown up!  I should mention I also top-stitched around the outside edge of the quilt, to help keep the batting in place and also to give the quilt a nice, crisp edge.

So, there it is...the project that started the "theme" for our little boy's room!  What came after finishing the quilt was a set of curtains (which I have semi-detailed in this post here) and was finished up with a little pillowcase (here)!  The curtains were made using a "pack" of fat quarters that matched the jelly roll and the pillowcase was made using another "pack", this time of pre-cut 5-inch squares.  I especially like the curtains because they can be taken down, washed, and re0hung however I feel like hanging them!  They are pocketed at the top and bottom exactly the same!  I can flip them over, trade positions, anything I feel like doing (except sideways)!  I may even take this idea into our "office" space once I get the curtain rods up down there...because I will eventually be sharing that space with Garrick (or he will be sharing with me since he has taken over the entire area right now), I'll even concede a bit and use some black in the curtains (backing counts, right?).  Those windows will only require a single curtain each, but, I also need to get curtains made to cover a 12-foot space to separate the office area from the living room space!  I have the curtain rod...just need to get it put up and get to sewing!  We semi-measured and I'll need 2 yards to reach from floor to curtain rod (4 yards really since they'll be seen from both sides, need to look nice coming and going) per curtain and I think I figured out I would need at least 6 curtains!  Yup...that's a winter project for after I find a killer deal on fabric (I'm talking 60 to 75% off or the $1 per yard sales)!

Sunday, August 26, 2012

August Catch-Up (Part 1)

What Garrick was looking at...
...What I was looking at!
Towards the beginning of the month (the second week of it anyway), Garrick went on a business trip to Washington, D.C. (I "got" to stay home).  He sent me a few photos of his tourist-ing while I was busily trying to get our nursery ready for the newest member of our little family, with the help of my Mother (and even a little help from our 6-year-old nephew who was also visiting).  He sent me that first photo in the top left...so, I sent him a photo of what I was doing!  I think he had a much better "view", ha!  But, after getting an extremely large bookcase emptied (nephew took boxes of books downstairs and loaded two of the giant sized Rubbermaid totes with books from the one bookcase), and all those totes and boxes and computer parts (there are four old, currently unused, computer "brains" and a busted monitor in that pile) moved out of what used to be Garrick's office...we had an empty room that we can now call a nursery!
The nursery!
Now for the really fun part...putting together all that baby furniture...ugh!  We started with the crib, because that's where the directions started.  I highly dislike Allen wrenches...it took several hours to get the crib "mostly" put together, with little to no effort (as far as parts not fitting and what not)...except for the fact that my thumbs and forefingers were killing me after hours of using the silly "wrench"! 

After we gave up on the crib (it was put together but nothing was tightened), we moved on to the changing table.  Here was our first big "we're never going to get this done" moment!  When we went to put the shelving bottoms on (the part you actually put stuff on), they didn't line up with the grooves in the cross beams!  We tried swapping them, we tried turning them over...nothing worked!  It was also getting late and none of us had eaten in about 8 hours, so we called it "break time" and went to get a late dinner.  Our break extended into bedtime and the next morning, we woke up with a solution!  We flipped over the piece that wasn't lining up and suddenly, it all went together like it was supposed to all along!

Last, but not least, we had the dresser to get put together...  We started with the drawers (again, because that's what the directions said to do...don't start with the drawers...) and upon trying to get the very first drawer put together...discovered that all the side pieces (the sides of each drawer) were warped so badly that they pulled against the screws and stripped the screw holes!  This would be the last thing we had to put together...I was dreading having to take the entire set apart to return it!  We had just spent the better part of 2 days putting it all together!  But, I loaded up all the dresser pieces and headed to Burlington Coat Factory (Baby Depot) where we purchased the set.  All I can say is that I absolutely love their customer service!  The cashier asked us to bring in the entire dresser, so I assumed we were going to get a new dresser box, but what the guy in the baby department did was bring us all the parts we were missing (the top piece in the back was missing) and all the spare parts he had for dressers!  He ended up giving us enough spare parts to make an entire spare drawer (minus the bottom of the drawer).  His side boards were all a little warped too, so he helped us pick the straightest boards and then gave us a few extra because he didn't have enough of one side (left or right) that would work, but it was really easy for me to move the drawer stop from one end to the other and make it work.  However, when we did get it home...I put the dresser together before the drawers so that I had somewhere to go with the drawers as we got them built!

Also, while we were at Burlington, a lady with twins had bought new car seats...I saw her putting them in her car when we got there.  When we came out to retrieve the dresser parts, she was gone and had left the old car seats (and all the garbage from the new ones) sitting in the parking lot!  I had my Mom go grab the car seats and bases...I plan to wash them up (the stink from spilled milk and such) and take them to a consignment shop or possibly use them as a trade-in for a discount at Babies 'R Us (25% off a new car seat when you bring in an old one, no matter the condition).  Either way...free car seats!

The furniture set also came with a hamper (wooden frame with a canvas bag) that is supposed to go under the changing table, but with how we have the furniture set up currently, it covers the heat vent and impedes air flow in the room.  I'm not sure where I'll end up keeping the hamper, but for now, it is next to the crib, in a corner, and a big basket my sister gave me (that just happens to match the furniture perfectly) is under the changing table, full of bibs and other tidbits that don't have a proper "home" yet filling it!  Also shown above...the quilt I've been working on!  I ended up putting a lighter blue flannel on the back (and using a lower loft batting in it than I planned on) and quilted it "in the ditch" following the long sewing lines.  We left it long so it can be tucked in while on a toddler bed (or in the crib) and once he grows into a bigger bed (the crib can be converted into a Full-size bed frame), it can go across the foot of the bed or used on a couch or something.  I liked the colors so much, that I decided to make a whole "nursery set" out of it!  The curtains were actually pretty easy to make too...I sewed fat quarters together (long side to long side and short side to short side) to make two panels, which later became the two curtains.  Then, we had to go shopping for a backing that looked decent with the colors (and get enough to make a matching crib sheet too).  The next step required that we actually make the crib sheet next. 

The pattern my Mom has been using for crib sheets (I now have four sheets and I believe each of my sister's two youngest have a sheet as well) is 44-45" fabric, cut at 70-inches.  Cutting 8-3/4" squares out of the corner (got bigger if you don't pre-wash the fabric) and sewing french seams leaves a nicely finished corner seam at each corner!  To finish the sheet, double fold your raw edge to create a 1/4 to 1/2-inch seam (depending on your elastic), we used 1/4-inch elastic, so that's the size seam we used as well.  Don't forget to leave yourself an opening to feed your elastic in through!  Cut a 90-inch piece of braided elastic (if you buy the little packets in the fabric store or WalMart that are 3 yards, just cut off 18 inches and you're set) and feed it through the opening.  I put a safety pin in both ends, one to use to feed it through and the other to keep the elastic from getting lost inside!  Stitch the elastic together (I usually zig-zag mine, my Mom straight stitches her's together) and stitch your opening shut (if needed, you can also just make the opening super tiny to begin with and then just ignore it after you feed in the elastic, this is handy if the elastic needs replacing, but it's up to you.

To finish up the curtains, we took what was left of the sheet fabric (we bought 5 yards, plus 2 inches), folded it in half long-wise and cut to make two pieces that were each 45" wide by whatever was there (I didn't measure).  I then centered the backing vertically with the fat quarter panels I had already made and sewed both side seams.  I then ironed the seams open and turned the whole thing right side out (creating approximately a 2" border using the backing fabric), centering the fabric once more and ironing flat.  To make the rod pockets, I first stitched the seams at all four ends were the backing and been sewn to the front panels, so that the rods wouldn't catch in the wrong area of the pocket.  Then, I measured how much backing I had beyond the front panel and divided by 2, allowing for an extra fold to make the seam edges look nice.  I ended up with 3-inch pockets at both top and bottom of each curtain (because of the design and how they are sewn, they can be flipped over and swapped on the rod, there is no set "top" of the curtains)!  We also installed a light-filtering roller shade behind the curtains to replace the blinds that were there.  The upside to the roller shade, besides the cheap price ($10 for the shade, $0.75 for the hanging hardware, and $2.50 for the handle which is totally optional but keeps the rod from sliding out so I recommend it), no cords!  Nothing for a little one to get tangled in at all!  I've also purchased a set of curtain hooks to hold back the curtains...but they aren't installed yet.

In the above photo, you can see how I can tuck in the quilt.  I really like how all the colors blend so well together!  The wire rack is another long story...but that piece got returned to Home Depot, we ended up not needing the "extra" shelf.  You can also see the hamper I mentioned in this photo, behind the pack 'n play...in the bottom left corner, that's my footstool with my breathable bumper on top!  The bumper is striped with greens, blues, and a bit of orange, and brown of course.  It just needs to be washed before it can go on the crib...also, the bumper fits down under the mattress a bit (to prevent kids from wiggling under the bumper) and it just doesn't fit when the quilt, sheet, and mattress protector are all in there!


Today while we were out and about, I found this cute little lamp!  I found it in the clearance section (near lighting) at Home Depot for $14 and couldn't resist!  The blue lamp shade is just a touch "off" to really match the room, but that's what I love about having so many shades of blue and green in here...it blends in really well!  I may make a matching lamp shade to go with the room, but I still have a pillow to finish for the "set" first!  The base is a teal glass with a few holes drilled for the wiring...super simple!  I'll get the plastic off the shade and the tags and stuff off of it later...when I get a light bulb in it.  To the left of the lamp is our baby monitor...for a fee, we can listen in on our little guy from our iPhones, iPads, and iPods!  We played with it a bit when we first got it several months ago, but are waiting until; little man is here before paying the $56 (or whatever it is) for a year of service on it (it's plugged in because the plug is behind the dresser...).  The wipes container is holding one set of cloth wipes and is acting as a "placeholder" for my wipe warmer I still need to get.  Since we'll be using cloth wipes and making our own wipe solution, I'd like to keep them warm to prevent the coconut oil in the solution from solidifying out of the mix!  The fabric on top of the dresser is a receiving blanket my Mom made (the baby's first gift)!  I have so many hand-me-down receiving blankets and this one looks great (to me) and is keeping the top of the dresser safe from nicks and dings.
One last shot of the crib and quilt... 

To come in future posts...the closet!  This story needs it's own post, trust me...  Also, I don't have any photos of the closet yet and I really need them to show off all of everyone's hard work in there!  I may even write about all the clothes...but again, need to get them all put away and sorted still...

Thursday, August 2, 2012

Chicken Coop and Other Things...

Gerty "inspecting" the clean coop.
So, I finally got the chicken coop cleaned today!  It really needed it bad I'm sorry to say...it has probably been about 5 months since I cleaned it out last, aside from changing out the hay in the nest box.  My girls don't really spend a lot of time in the coop, so it wasn't "totally" disgusting or anything...just "icky" from night time poops mostly. 

Today though, the girls got into yet another fight over the one and only nest box that any of them will use, knocking it over not once, but twice!  When I first got up this morning, I went down and turned it right side up...with Gertrude firmly attached to the interior of said nest box, I might add!  Within a few hours, they had they box overturned, completely this time, and all three were raising a ruckus outside!  I don't want to say my girls are quiet by any means, they are after all a vocal animal, but they are "quieter than most" and really don't get "loud" unless they've just laid an egg or there is a serious problem in the chicken run.  When I say "serious", I mean they ran out of food or water (these have both happened once, maybe twice if I wasn't feeling well) or if there is an issue inside the coop (usually pertaining to the single nest box).  This is when having the security camera on the TV in the dining room comes in handy...I can tell when it's a food/water issue or a "coop" issue (of course, it also helps if you don't accidentally lock them in the coop the night before...).  Since I could see they had overturned the nest box again, I decided it was just time to clean the coop and be done with that chore (until shortly before the baby gets here...but hopefully I'll have a little help with that cleaning).

Clyde was the first to claim the fresh nest box!
Months back when we cleaned out the garage, my Mom washed up an old garbage can for us and we put the open bag of pine shavings in it (I had bought 2 large bags because I got them on sale for more than half off).  However, it never got moved to the run!  So, to start, I had to drag that around the house, really it was less work than it sounds...it's a plastic garbage can and the pine shavings don't weigh much at all, it's just big and awkward (and hard to carry when you've got a baby bump).  Also, I took one of my handy Kitty Litter container to the garage to grab some fresh hay for the nest box.  In the 35-pound container, I can fit enough hay for two or more "fresh" changes!  The hay "bale" is an equally large plastic "sack" full of chopped hay, it was much cheaper than buying a bale of hay.

Gerty checking out my iPhone...
I have worked out a pretty simple Coop Cleaning System really...I just use a broom!  One of these days, I know I need to get out there with an actual cleaning solution and give the floor a good mopping, but we haven't had any issues with the girls being sick or any sort of bugs, so I think the system is working okay.  When we first moved the girls outside last summer, I was carting the used bedding away and dumping it in our make shift compost heap behind the shed...all we're really doing back there is making a huge pile of junk and by December, I wasn't willing to cart it across the snow.  So, "plan B" came into being and we've been using it happily ever since!  Now, I just sweep the old, icky stuff out of the coop into a pile below it.  After the coop is emptied onto the ground, I just shove it the best I can under the coop and the girls distribute it from there.  With all that old chicken poop now in the ground, it attracts bugs and the girls eat the bugs, win-win!  Then, I just put Pine shavings in the unused nest box (if I put hay in it, it just gets kicked out anyway) and that box goes in the corner I can't reach. 
Henri also needing to use the box
Next, I put the fresh Hay in the cat box turned nest box that all three girls use and it goes next to the unused box.  This keep the box they're actually laying in within reach and I can get the eggs by simply sticking my hand in the pop door!  Once the boxes are in place, I start tossing in handfuls of Pine shavings until I'm happy with the thickness of the bedding (usually 2 to 3-inches deep).  Then, I just close up the coop and walk away feeling accomplished!

I also spent a little time on the goings on in the chicken's run as well.  We recently made the switch to pellets instead of crumbles.  This was a change I really wanted to make last year when the girls got weened off of chick starter, but until this last visit to the feed store, they've always been out of pellets!  Pellets take up a little less space, meaning in a week, we're already down to only having 2 litter containers full instead of three.  Some say pellets reduce the amount of feed chickens waste, but my girls never let any food go to waste, so I can't see any difference there!  I also refilled their water with fresh...last time I cleaned their water dish and put a little Apple Cider Vinegar in it as well (good for them, but I fail to remember why).  I need to remember to not do that!  The girls don't like it, they drink less water than they do normally, the water turns milky and mold grows (gross)!  So, I dumped it out and gave them a container of fresh, clean water today as well!

Then, I got to moving some of the stuff in the coop around...a few weeks ago, we (Garrick) finally got sand back in the sand box!  The girls have gotten pretty good at digging through the river rocks and finding the sandy dirt below it, but they really enjoy climbing into their turtle "tub" for a sand bath more!  I also moved the Sumac limbs around a little too, made them more horizontal...the gals have never really climbed on them as they were and I needed to make room for the "new" garbage can storage out there!  I may need to raise the feeder up a little now though, we'll see if they start making a mess out of it!  It may be a good thing to mention that the big white bucket is my water system (two nipples drilled into the bottom of that bucket) and in reality, it is several feet away from the turtle.

And in other chicken "stuff", I do believe as of today, all the girls are back to laying!  Gerty has been dropping a ton of feathers everywhere, but I don't think she "looked" like she was molting...however, she laid a 1.7 ounce "torpedo" egg today! I know it was Gerty because she was the only hen not fighting for the box after I cleaned the coop.  It has been several months since we've gotten 3 eggs a day!  Of course, the day before we go out of town for several days isn't the ideal time for us to get an influx of eggs...especially when I didn't line up a chicken-sitter for this trip!

I guess getting moving is what I rally needed to do recently too...over the past several days I have been dealing with increasingly more swollen ankles!  Today they were/are so bad, that even my fuzzy slippers are leaving a crease line in the middle of my foot!  But, I did manage to get a pair of socks and shoes on to go out and deal with the coop, and surprisingly, once I was done, I noticed that my right foot was a little less swollen.  Of course, the relief lasted until I sat down for 5 minutes...so it was short lived relief.  I'm gonna try soaking them later, maybe that will help?

While I was outside, I decided to snap a quick photo to show how tall my tomato plants are this year!  They're in large pots on the back deck and if you only count the part above dirt, they all start about mid-shin on me.  Boy do I look puffy today!

And here is a preview of a post I'm planning for the future (near I promise)...aren't the colors just awesome?  It's a quilt, and I am sort of following a pattern...but more on that once it's finished!

Wednesday, July 25, 2012

Hello 3rd Trimester!

According to the "handy dandy" app I have on my iPhone from What To Expect...  today marks the very first day of my third trimester with the little man!  I am so excited and a little scared all at the same time.  I can't wait to meet this little guy, he's been wanted for a very long time, but at the same time, I don't feel like we are "ready" yet.  We're ready to be parents, but the house...oh the house!  His future bedroom/nursery is still a working office, we have nothing (okay, I do have a few {dozen} diapers, but not nearly in the quantity we need) to put on his rump, clothes...well, we have lots of hand me downs, but not a ton in any one size (my sister has given me everything nephew #4 is outgrowing and another friend gave me a box of 6+ months stuff) and I just have this sneaking suspicion that this guy is gonna be tiny

I was complaining (whining really) over the weekend that it felt like the little man was trying to "make more room in there" for a growth spurt and I think I was right!  Besides the fact that clothes that fit last week no longer fit, he is really rocking and rolling in there!  Last night before going to sleep he was really hunching/kicking really hard, harder than I have ever felt!  And he continued it all...night...long!  Even as I type, he's in there practicing to be an MMA fighter I think!  I'm thinking tomorrow will be a "quieter" day though since he seems to be doing a lot today!  Just as long as he cooperates on Friday, we have yet another ultrasound because the doctor hasn't been able to "see everything" he wants to see yet, this will make our third "anatomy scan"!

Other than baby stuff, I have had a pretty full week so far (keep in mind it's only Wednesday)!  Yesterday I made another batch of dog food, this time we used Hamburger, mostly because we had bought a pound for us to eat and plans changed...we are horrible about using stuff in our freezer, so I made dog food with it instead of trying to "save" it for another day.

Before the Rice got added!
Beef/Veggie/Rice "Dog Stew"
  • 2 lbs Hamburger (I used 1 80/20 & 1 93/7, we buy leaner meat for us than we do for the dog)
  • 12 cups cooked Rice
  • 2/3 of a 1 lb bag Frozen Chopped Spinach
  • 1-1 lb bag Frozen Green Beans (French style cause they're $0.98 a bag)
  • 1-1 lb bag Fozen California Blend (Cauliflower, Broccoli, Carrots)
  • 1 Qt Beef Broth (I use 4 cups of hot water and a heaping tablespoon of Better then Bouillon in Beef Flavor)
  • 1 container Cottage Cheese (okay, it was more like 3/4 of the container, but it was going bad)

I started by making up a batch of rice in our (still new) rice cooker, it makes 6 cups of rice at a time.  After that batch, I took the rice out and put in a big glass bowl to cool and let the cooker cool so I could handle it to clean it and get another batch going!  After getting the second batch of rice set up, I grabbed the steamer basket that came with the rice cooker and tossed in about two-thirds of the bag of frozen Spinach, it filled the steamer basket!  By the time the rice was cooked, the Spinach was perfectly steamed and all the nutrients from it had dripped into the rice (I see a few dinners for us being made this way in the near future), turning some of the rice green!  After the last batch of rice was cooling (the first batch went into a ziploc and the rice and spinach went in the bowl), I got the hamburger cooking in our "dog food pot", which is a 12-Qt stock pot that I burned rice in (you remember the day my rice cooker died and I got to talk to the alarm company because I set off the smoke detector, right?)...most of the black is gone from it, but we weren't using it for anything else and this way, I can add doggie supplements (when we have them) without worrying if I have them all scrubbed out before I cook for the humans in the house.  I didn't bother adding any oils this time, the meat had plenty of fats in it! 

While the meat browned, I finally got my Laundry Soap bottled (in milk jugs that have been washed out and saved)!  I don't fill the jugs all the way, that way there is room to shake up the contents and distribute the soap in the water better.  This batch (the double batch I made a month or so ago) turned out really runny.  But, I got it in three 1-gallon jugs and four half-gallon jugs (but really it's only about 4 gallons of laundry soap)!  Some of it is going to go home with my Mom when she visits next month, but with what I have left still from the first batch I made (about half a gallon) and what I keep of this, I should have a year's supply of soap, lol.

Between filling each jug, I stirred the meat.  Once there was no more pink in the meat, I added both bags of frozen vegetables, normally I thaw these while the other parts cook, but I forgot, so they went in straight from the freezer this time.  It works either way, but the frozen veggies solidified all the fat and looked really gross.  After giving the veggies some time to hang out with the meat a little, I added the Beef broth (to make this, I take my 2-Qt glass measuring cup, [get one if you don't have one they are a kitchen neccessity] and this time only used 4 cups of hot tap water because the rice was already cooked.  I used a Tablespoon and just made it heaping, 4 teaspoons of the base makes 4 cups of broth.  Once you get it off the spoon, microwave it for 2 to 3 minutes and get it nice and hot!  It'll help dissolve the base.).  Let that all come to a boil, it cooks the veggies and lets everything soak up a little broth.  Then, turn off the heat and dump in the rice!  I mixed between each addition of rice, it gets really hard to stir with 12 cups of rice in there!  After it's all mixed, I divide the mixture between the glass bowl I let the rice cool in, the measuring cup, and the stockpot so that it cools faster...don't add dairy to hot food!  Then, we left the house and went to lunch...this stuff takes forever to cool off! 
 
Rosie follows me when I'm cooking Dog Food!
Later in the afternoon, I divided what I had of the Cottage Cheese between the dishes and gave it one last mix.  Then, it was portion-bagging time!  Rosie weighs in at 61 pounds, and most sites suggest 2-3% of the dog weight be fed daily, that puts her food needs at 19.5 to 29.3 ounces.  We give her roughly 2-cups of food, twice a day (two bags of pre-portioned food weigh in at 25.0 ounces).  We bag it all up once cooled into sandwich size ziploc bags for easy feeding throughout the week (Garrick does most of the feeding, I do the cooking).

This batch gave us 13.5 servings (or 6.5 days of food and a little "taster" plate for Rosie when we were done bagging, because who can resist that look on her face after hours of seeing it?

The chickens got the rest of the bag of Spinach, but they didn't eat it!  It's the first thing other than potatoes that they refuse to eat!  I was shocked because they loved it in the winter, but this time it was served room temperature, not hot like before.  Speaking of the gals, they got a mini-coop clean up this morning!  I noticed that the hook we hang our water from was being bent under the weight of the water, so I took it down, scrubbed it clean, and moved it to a new hook (we have 3 to use for the water and food, luckily).  I also hosed out their sandbox, which has been empty for a while now and was beginning to look more like a public bathroom than a place to take a bath in!  Since I was out there anyway, I also took them one-quarter of a "personal size" watermelon that I bought (in June).  The flesh was still very firm, but it was beyond anything I would want to eat.  It took some convincing to get the girls to try it, but they eventually did and last time I checked, they were enjoying the cool treat!  The rest of the melon got cut into sections, bagged, and tossed in the freezer (we have some high 90's days headed our way) for the girls to have another day.  To get them to try the melon, a new food for them, I sprinkled the pieces with Red Chili Pepper pieces (a favored treat and natural wormer), BOSS (just a yummy treat), and finally, a few Meal-worms (Gerty is the only chicken I have that likes these, but once she got interested in the melon pieces, Clyde and Henri soon followed)!

And since I was outside anyway...I went ahead and watered my "deck plants".  They don't get any direct sun in the afternoon/evenings, so I figure I'm okay to do that.  It also is only 83 today, so not scorching!  My Raspberry bushes are really filling in this summer, as is all the weeds and "voluntary" Blackberry bushes!

The one and only tomato plant that I have actually producing any tomatoes is absolutely loaded with them!  I may pick one or two to have with dinner tonight, they look like they might be ready.  They're a little bigger than a Cherry Tomato!

One night this week I'm finally going to harvest some of my Pineapple Sage too, though I'm not sure what night that will be just yet.  It is such a full, bushy plant this year!  I'm hoping that it will make the transition to an indoor plant this Fall, the Stevia did well last year so I am hopeful.  I'd really like to have this herb around year-round!

I'm not quite done with my busy day today either, I need to go do some shopping!  (Twist my arm, huh?)  I'm looking to get enough fabric to make two reversible/lined slings...mostly because my pre-pregnant size is between sizes on the cutting chart, but also because Garrick is squarely in the lerger size and I want him to be able to pack little man around too.  Also, I found a tutorial for making a quilt out of a Jelly Roll that looks super simple and a new skill to be learned (quilting) at the same time!  Then there's the "cover the window on the door" project that I still need to get some magnets for, groceries to buy, and baby stuff to ogle!